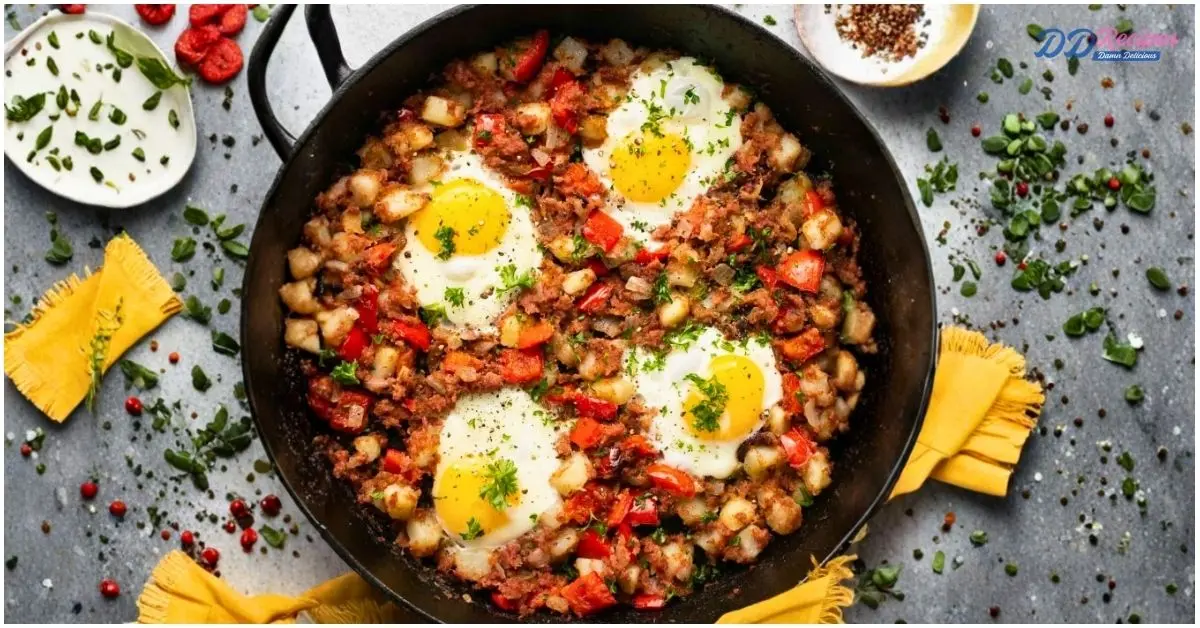
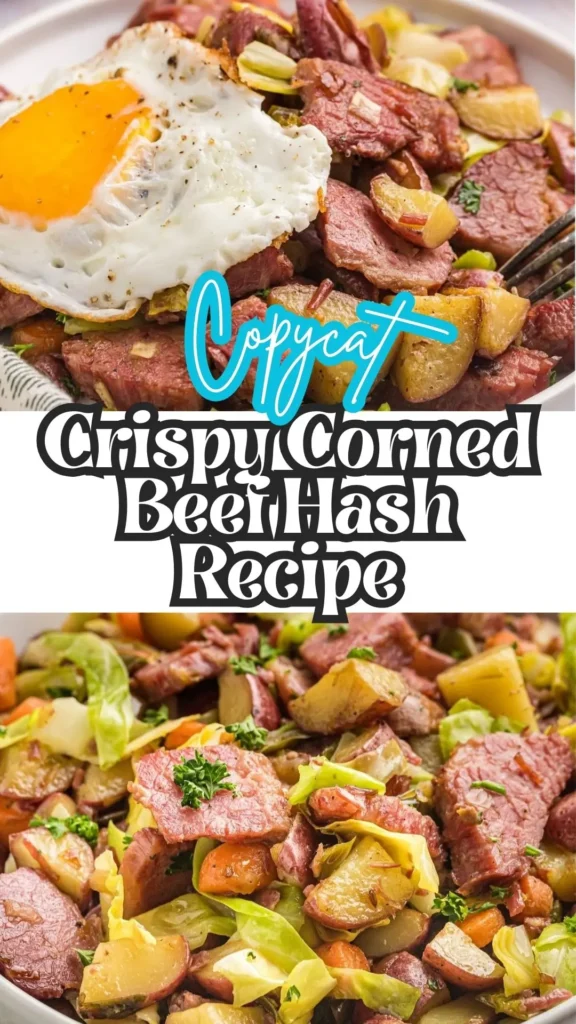
Crispy Corned Beef Hash Recipe
There’s something incredibly satisfying about a perfectly crispy corned beef hash golden-brown potatoes, tender chunks of savory corned beef, and those irresistible caramelized bits that stick to the bottom of your cast-iron skillet.
This copycat crispy corned beef hash recipe transforms simple ingredients into a restaurant-quality breakfast that’s crunchy on the outside and tender on the inside.
Whether you’re using leftover homemade corned beef or store-bought brisket, learning how to make crispy corned beef hash at home means you’ll never settle for soggy, lackluster versions again. Let’s dive into the secrets of achieving that perfect golden crust!
What Does Crispy Corned Beef Hash Taste Like?
Imagine savory, well-seasoned corned beef with its characteristic peppery, slightly salty flavor profile mingling with earthy, buttery potatoes that crackle with each bite.
The caramelized onions add a subtle sweetness that balances the salt-cured meat perfectly. Each forkful delivers contrasting textures crispy, golden-brown edges give way to tender potato interiors and juicy beef chunks.
The seasoning blend adds layers of garlic, paprika, and warm spices that enhance without overpowering. When topped with a runny fried egg, the rich yolk creates a luscious sauce that ties everything together into pure breakfast comfort.
Crispy Corned Beef Hash Recipe Ingredients
Main Ingredients:
- 1 fully cooked corned beef brisket (homemade or store-bought)
- 4–5 medium-large russet potatoes (enough to match corned beef amount)
- 1 small to medium onion, diced
- 4 tablespoons butter (plus more as needed)
- 2 pinches salt (corned beef is already salty)
- Fresh cracked black pepper (generous amount)
- 1–2 teaspoons seasoning blend (paprika, garlic powder, onion powder mix)
Optional Toppings:
- Fried eggs (over-easy recommended)
- Shredded cheese (cheddar or your favorite)
Kitchen Utensils Needed:
- Large cast-iron skillet or heavy-bottomed pan
- Sharp chef’s knife
- Cutting board
- French-fry cutter (optional but helpful)
- Large pot for parboiling
- Mixing bowl
- Paper towels
- Slotted spoon or spatula
- Colander
Preparation and Cooking Time
Prep Time: 15 minutes
Cook Time: 25–30 minutes
Total Time: 40–45 minutes
Servings: 4–6 servings
Difficulty Level: Easy to Moderate
How to Make Crispy Corned Beef Hash: Step-by-Step Instructions
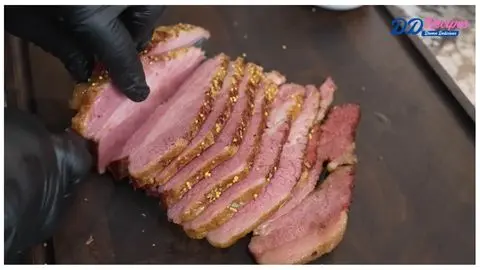
Step 1: Prepare the Corned Beef
Slice your fully cooked corned beef brisket into manageable sections. Cut against the grain to ensure tender pieces, then cube into bite-size chunks (approximately ½-inch pieces). Keep some of the fat pieces they add incredible flavor and help with crisping. Set aside in a bowl.
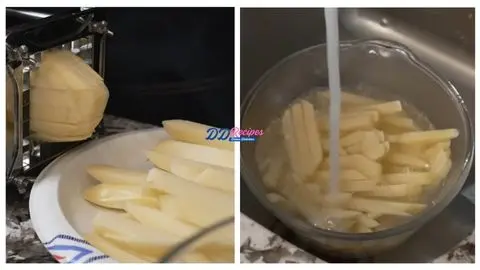
Step 2: Prep the Potatoes
Peel all russet potatoes completely. For faster, more uniform cubing, use a french-fry cutter to create long fry shapes first, then cut crosswise into ½-inch cubes. If cutting by hand, aim for consistent sizing so everything cooks evenly.
Step 3: Remove Excess Starch
Place cubed potatoes in a large bowl filled with cold water. Swish them around, then drain. Repeat this rinsing process 2–3 times until the water runs clear. This crucial step removes excess starch, which is the secret to achieving maximum crispiness. Drain thoroughly and pat completely dry with paper towels.
Step 4: Parboil the Potatoes
Place dried potato cubes in a pot and cover with cold water. Bring to a boil over high heat, then reduce to medium-high. Cook just until potatoes are about 90% fork-tender (a toothpick should insert easily but they shouldn’t be falling apart) this takes only 3–5 minutes for small cubes. Immediately drain, rinse quickly with cold water to stop the cooking process, and drain again thoroughly.
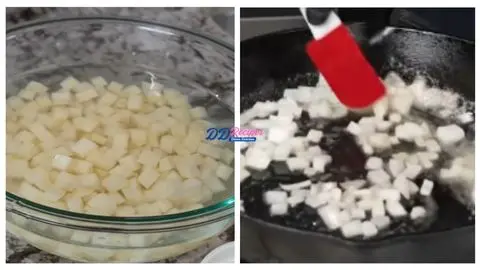
Step 5: Start with Butter and Onions
Heat your large cast-iron skillet over medium-low heat. Add 4 tablespoons of butter and allow it to melt completely. Add diced onions and cook slowly, stirring occasionally, until they’re soft and starting to caramelize (about 5–7 minutes). You want them almost melting into the butter this builds the flavor foundation.
Step 6: Add the Corned Beef
Add all the cubed corned beef to the pan, including those flavorful fat pieces. Stir everything together so the meat gets coated in the butter-onion mixture. Spread into an even layer and let it sit undisturbed for 2–3 minutes to start developing a crust on the bottom.
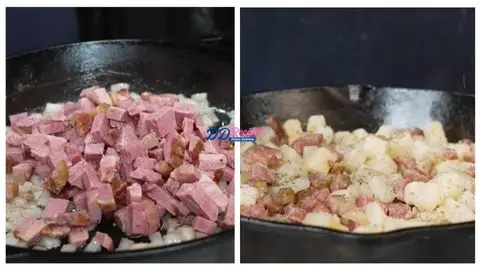
Step 7: Incorporate Potatoes and Season
Add the parboiled potato cubes to the skillet. Season generously with fresh cracked black pepper, your seasoning blend (paprika, garlic powder, onion powder), and just a couple small pinches of salt (remember, corned beef is already quite salty). Gently fold everything together with a spatula, being careful not to mash the potatoes.
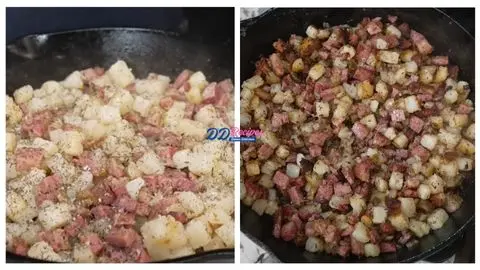
Step 8: Achieve Maximum Crispiness
Increase the heat to medium or medium-high. Press the hash down gently with your spatula and let it sit undisturbed for 2–3 minutes until you hear sizzling and popping. Use the spatula to flip sections over, exposing new surfaces to the hot pan. Continue this process letting it sit, then flipping for 10–15 minutes until you have beautiful golden-brown, crispy edges throughout. Add more butter if the pan seems dry.

Step 9: Final Touches and Serve
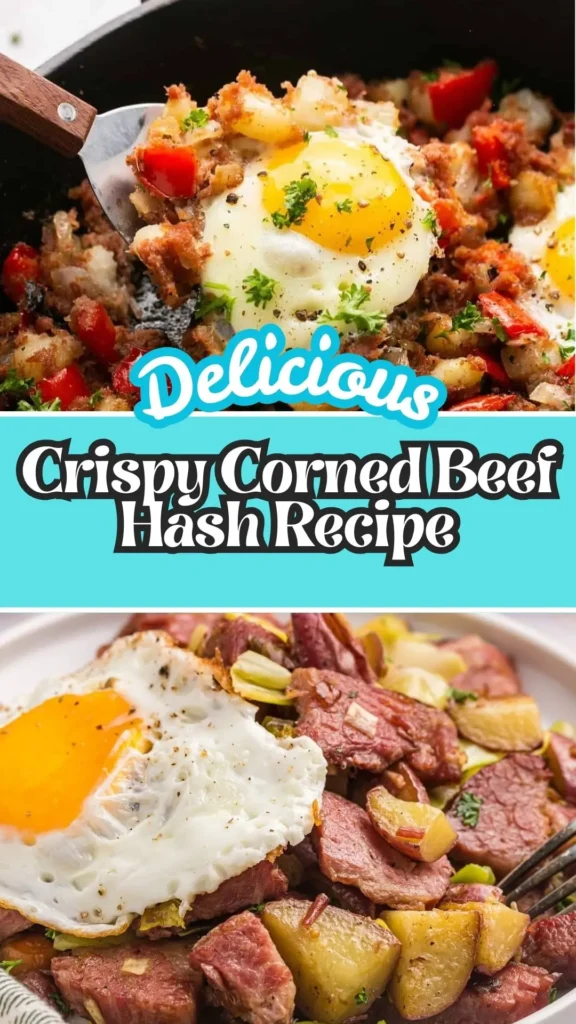
Once your crispy corned beef hash has achieved maximum golden-brown perfection with plenty of crunchy bits, turn off the heat. Serve immediately while hot and crispy. Top each portion with a fried egg (over-easy works beautifully) and a sprinkle of shredded cheese if desired. The runny yolk becomes a natural sauce that takes this dish to the next level.
Customization and Pairing Ideas for Serving
1. Classic Diner Style with Eggs and Toast
Serve your crispy corned beef hash alongside buttered sourdough toast and over-easy eggs. Add a side of fresh fruit or sliced tomatoes for brightness. This traditional pairing is what diners have perfected the toast is perfect for sopping up runny yolk and any butter left in the pan.
2. Breakfast Burrito Transformation
Turn your hash into a hearty breakfast burrito filling. Spoon the crispy mixture into large flour tortillas, add scrambled eggs, shredded cheese, sour cream, and hot sauce. Roll tightly and grill the outside for extra crispiness. This portable version is perfect for busy mornings.
3. Hash Benedict Elevation
Create a corned beef hash benedict by placing poached eggs on top of your crispy hash instead of English muffins. Drizzle with hollandaise sauce and garnish with fresh chives. This luxurious twist combines two breakfast classics into one impressive brunch dish.
4. Sauce-Lover Corned Beef Hash Plate
Serve crispy corned beef hash hot from the pan. Add a fried egg on top. Spoon El Pollo Regio green sauce over the potatoes for a fresh, tangy taste. Add a little Bonchon spicy sauce for sweet heat. These sauces make the corned beef hash bold and exciting. Keep toast or tomatoes on the side to balance the rich flavors. This serving idea is great for breakfast or brunch.
5. Loaded Hash Bowl
Build a customizable hash bowl with your crispy corned beef base. Top with avocado slices, cherry tomatoes, sautéed peppers, cheese, and your choice of hot sauce or sriracha mayo. Add a fried egg on top for protein-packed perfection.
6. Add Fresh Vegetables
Mix in bell peppers (red, green, or both), diced jalapeños for heat, or even some spinach in the last few minutes of cooking. These additions add color, nutrition, and extra flavor dimensions while maintaining that essential crispiness.
7. Brunch Board with Corned Beef Hash and Appetizers
Place crispy corned beef hash in the center of the table. Serve Jack in the Box egg rolls as a crunchy starter. Add Friday’s spinach artichoke dip with toasted bread on the side. This setup is fun and easy to share. Each item has a different texture and flavor. It works well for family brunch or weekend gatherings.
8. International Fusion Variations
Try Irish-inspired additions like cabbage cooked alongside the onions. Go Southwestern with cumin, chili powder, and topped with salsa verde. Or create an Asian fusion version with ginger, sesame oil drizzle, and a soft-boiled egg with soy sauce.
9. Cheese Lover’s Dream
Just before serving, sprinkle shredded sharp cheddar, Gruyère, or pepper jack cheese over the hot hash and cover briefly to melt. You can also create a cheese crust by sprinkling cheese directly on the pan surface, letting it crisp up, then flipping that section for ultimate indulgence.
10. Dinner-Style Corned Beef Hash with Jasmine Rice
Turn corned beef hash into a simple dinner bowl. Start with Bonefish jasmine rice as the base. Add a smaller portion of crispy corned beef hash on top. Finish with El Pollo Regio green sauce for a fresh taste. The soft rice balances the crispy hash. This pairing makes corned beef hash filling but not too heavy.
Essential Tips for Perfect Crispy Corned Beef Hash
1. Choose the Right Potatoes
Russet potatoes are absolutely essential for the crispiest corned beef hash. Their high starch content creates that perfect golden crust we’re after. Waxy potatoes like red or Yukon gold contain more moisture and less starch, which means they’ll steam rather than crisp. Stick with russets and you’ll never be disappointed.
2. Dry Everything Thoroughly
Moisture is the enemy of crispiness. After rinsing your potatoes, take the extra time to pat them bone-dry with paper towels. Even shake them in a colander to remove every last drop. Similarly, if your corned beef seems wet, pat it dry too. Water creates steam in the pan, which leads to soggy hash instead of that coveted crunch.
3. Don’t Skip the Parboiling Step
While you could use raw potatoes, parboiling is the secret shortcut that ensures tender interiors and crispy exteriors simultaneously. Raw potatoes take too long to cook through, meaning your corned beef overcooks or your potatoes burn on the outside while staying raw inside. Parboiling to 90% doneness solves this perfectly.
4. Resist the Urge to Stir Constantly
The biggest mistake people make when learning how to make crispy corned beef hash is stirring too frequently. You need to let the hash sit undisturbed on the hot pan surface to develop that golden-brown crust. Think of it like making pancakes patience creates crispy perfection. Flip sections every 2–3 minutes, not every 30 seconds.
5. Use Cast Iron or Heavy Pans
A cast-iron skillet retains and distributes heat more evenly than thin pans, creating consistent browning across every inch of your hash. The heavy material also prevents hot spots that burn some pieces while leaving others pale. If you don’t have cast iron, use the heaviest pan you own and be prepared to adjust heat more frequently.
6. Temperature Control is Critical
Start with medium-low heat for the onions and initial corned beef cooking to develop flavor without burning. Once you add potatoes, increase to medium or medium-high for the crisping phase. If things are browning too fast or starting to burn, reduce heat slightly. You want steady sizzling, not aggressive smoking.
7. Season Sparingly with Salt
Since corned beef is salt-cured and naturally quite salty, you need very little additional salt in this recipe. Start with just a couple small pinches and taste before adding more. Focus instead on black pepper and your seasoning blend for flavor complexity. You can always add salt at the table, but you can’t remove it once it’s in.
Storage and Reheating Guidance
Store leftover crispy corned beef hash in an airtight container in the refrigerator for up to 3–4 days. Reheat in a skillet over medium-high heat with a little butter to restore crispiness avoid the microwave as it makes everything soggy. You can also freeze portions for up to 2 months; thaw overnight and reheat in a hot skillet.

Crispy Corned Beef Hash Recipe
There’s something incredibly satisfying about a perfectly crispy corned beef hash golden-brown potatoes, tender chunks of savory corned beef, and those irresistible caramelized bits that stick to the bottom of your cast-iron skillet.
Ingredients
- 1 fully cooked corned beef brisket (homemade or store-bought)
- 4–5 medium-large russet potatoes (enough to match corned beef amount)
- 1 small to medium onion, diced
- 4 tablespoons butter (plus more as needed)
- 2 pinches salt (corned beef is already salty)
- Fresh cracked black pepper (generous amount)
- 1–2 teaspoons seasoning blend (paprika, garlic powder, onion powder mix)
- Fried eggs (over-easy recommended)
- Shredded cheese (cheddar or your favorite)
Instructions
Step 1: Prepare the Corned Beef
Slice your fully cooked corned beef brisket into manageable sections. Cut against the grain to ensure tender pieces, then cube into bite-size chunks (approximately ½-inch pieces). Keep some of the fat pieces they add incredible flavor and help with crisping. Set aside in a bowl.
Step 2: Prep the Potatoes
Peel all russet potatoes completely. For faster, more uniform cubing, use a french-fry cutter to create long fry shapes first, then cut crosswise into ½-inch cubes. If cutting by hand, aim for consistent sizing so everything cooks evenly.
Step 3: Remove Excess Starch
Place cubed potatoes in a large bowl filled with cold water. Swish them around, then drain. Repeat this rinsing process 2–3 times until the water runs clear. This crucial step removes excess starch, which is the secret to achieving maximum crispiness. Drain thoroughly and pat completely dry with paper towels.
Step 4: Parboil the Potatoes
Place dried potato cubes in a pot and cover with cold water. Bring to a boil over high heat, then reduce to medium-high. Cook just until potatoes are about 90% fork-tender (a toothpick should insert easily but they shouldn’t be falling apart) this takes only 3–5 minutes for small cubes. Immediately drain, rinse quickly with cold water to stop the cooking process, and drain again thoroughly.
Step 5: Start with Butter and Onions
Heat your large cast-iron skillet over medium-low heat. Add 4 tablespoons of butter and allow it to melt completely. Add diced onions and cook slowly, stirring occasionally, until they’re soft and starting to caramelize (about 5–7 minutes). You want them almost melting into the butter this builds the flavor foundation.
Step 6: Add the Corned Beef
Add all the cubed corned beef to the pan, including those flavorful fat pieces. Stir everything together so the meat gets coated in the butter-onion mixture. Spread into an even layer and let it sit undisturbed for 2–3 minutes to start developing a crust on the bottom.
Step 7: Incorporate Potatoes and Season
Add the parboiled potato cubes to the skillet. Season generously with fresh cracked black pepper, your seasoning blend (paprika, garlic powder, onion powder), and just a couple small pinches of salt (remember, corned beef is already quite salty). Gently fold everything together with a spatula, being careful not to mash the potatoes.
Step 8: Achieve Maximum Crispiness
Increase the heat to medium or medium-high. Press the hash down gently with your spatula and let it sit undisturbed for 2–3 minutes until you hear sizzling and popping. Use the spatula to flip sections over, exposing new surfaces to the hot pan. Continue this process letting it sit, then flipping for 10–15 minutes until you have beautiful golden-brown, crispy edges throughout. Add more butter if the pan seems dry.
Step 9: Final Touches and Serve
Once your crispy corned beef hash has achieved maximum golden-brown perfection with plenty of crunchy bits, turn off the heat. Serve immediately while hot and crispy. Top each portion with a fried egg (over-easy works beautifully) and a sprinkle of shredded cheese if desired. The runny yolk becomes a natural sauce that takes this dish to the next level.
Notes
Store leftover crispy corned beef hash in an airtight container in the refrigerator for up to 3–4 days. Reheat in a skillet over medium-high heat with a little butter to restore crispiness avoid the microwave as it makes everything soggy. You can also freeze portions for up to 2 months; thaw overnight and reheat in a hot skillet.
Nutrition Information:
Yield: 4 Serving Size: 1Amount Per Serving: Calories: 220
Common Queries and FAQs
Here, we’ve got you covered with some common questions about the Crispy Corned Beef Hash Recipe that people often ask.
Can I use canned corned beef instead of fresh brisket?
Yes, canned corned beef works in a pinch, though the texture and flavor won’t be quite as good as using properly cooked brisket. Canned corned beef is much softer and saltier, so you’ll want to break it into chunks rather than cubes, and definitely skip any additional salt. The hash will still be delicious but may lack some of those crispy meat edges that make this recipe special.
What’s the best way to cut potatoes for maximum crispiness?
Cut your potatoes into uniform ½-inch cubes for the best results. This size is small enough to cook through quickly while large enough to develop crispy exteriors. Using a french-fry cutter first creates consistent shapes that crisp evenly. Avoid cutting too small (they’ll turn mushy) or too large (they won’t crisp properly before the corned beef overcooks).
Do I have to parboil the potatoes or can I use raw?
While you can use raw potatoes, parboiling is highly recommended for this crispy corned beef hash recipe. Raw potatoes require much longer cooking times to become tender, which means you risk burning the corned beef or having unevenly cooked hash. Parboiling to 90% doneness ensures tender insides and crispy outsides in a fraction of the time.
My hash keeps turning out soggy what am I doing wrong?
Soggy hash usually results from excess moisture or insufficient heat. Make sure you’re thoroughly drying your parboiled potatoes with paper towels before adding them to the pan. Use a cast-iron skillet or heavy pan that retains heat well. Most importantly, resist constant stirring let the hash sit undisturbed for 2–3 minutes between flips so a proper crust can form.
Can I make corned beef hash ahead of time?
You can prep components ahead (cube the corned beef and potatoes, store separately in the fridge), but for best results, cook the hash fresh when you’re ready to serve. Crispy hash doesn’t reheat well while maintaining that signature crunch. If you must make it ahead, undercook it slightly, refrigerate, then finish crisping in a hot skillet just before serving.
What type of corned beef works best for hash?
Fully cooked corned beef brisket whether homemade or store-bought works beautifully. Point cut brisket has more fat and creates richer, more flavorful hash with extra crispy bits. Flat cut is leaner but still delicious. Leftover corned beef from St. Patrick’s Day dinner is absolutely perfect. Just make sure it’s already fully cooked before you start this recipe.
How do I prevent my corned beef hash from sticking to the pan?
Use enough fat (butter, oil, or reserved corned beef fat) to create a barrier between the food and pan. Cast-iron skillets naturally develop a non-stick surface when properly seasoned. Don’t try to flip the hash too early when a proper crust forms, it naturally releases from the pan. If it’s sticking stubbornly, it’s not ready to flip yet; give it another minute.
Can I add vegetables to this crispy corned beef hash recipe?
Absolutely! Bell peppers, jalapeños, and diced cabbage are popular additions that complement the corned beef flavor profile. Add heartier vegetables like peppers with the onions so they have time to soften. Add quick-cooking items like spinach or scallions in the final minutes. Just remember that adding vegetables introduces moisture, so you may need slightly longer cooking time to achieve maximum crispiness.
What seasonings work best besides salt and pepper?
A blend of paprika, garlic powder, and onion powder is traditional and works wonderfully. Smoked paprika adds depth, while a pinch of cayenne brings subtle heat. Some people love adding dried thyme or parsley. Start with the basics and adjust to your taste preferences. Remember that corned beef already has pickling spices in it, so you’re enhancing, not overpowering.
Is it better to use butter or oil for cooking the hash?
Butter provides superior flavor that perfectly complements corned beef and potatoes, making it the preferred choice for this recipe. However, butter can burn at high heat, so watch your temperature carefully during the crisping phase. If you’re concerned about burning, use half butter and half vegetable oil, or use clarified butter (ghee) which has a higher smoke point while maintaining that buttery taste.
How do I know when my corned beef hash is done?
Your hash is perfectly done when it has developed multiple golden-brown, crispy sections throughout, the potatoes are fully tender when pierced with a fork, and you can hear and see active sizzling in the pan. Visually, you’re looking for varied shades of brown from light golden to deeper caramelized spots. The aroma should be intensely savory and toasty. Taste a small piece to confirm seasoning and texture.
Can I freeze cooked corned beef hash?
Yes, corned beef hash freezes reasonably well for up to 2 months. Let it cool completely, then portion into freezer-safe containers or bags. The texture won’t be quite as crispy after freezing, but the flavor remains excellent. Thaw overnight in the refrigerator, then reheat in a hot cast-iron skillet with butter to restore as much crispiness as possible. Never microwave from frozen.
This copycat crispy corned beef hash recipe delivers everything you crave in a perfect breakfast golden-brown potato cubes, savory chunks of tender corned beef, and those irresistibly crunchy caramelized bits that define restaurant-quality hash.
By following these crispy corned beef hash recipe ingredients and techniques, especially the parboiling method and patience during the crisping phase, you’ll achieve results that rival any diner.
Whether you’re using leftover St. Patrick’s Day brisket or starting fresh, this is comfort food at its finest. Fire up that cast-iron skillet and treat yourself to breakfast perfection!
You can also follow us on Pinterest, and YouTube for more delicious updates and kitchen inspiration. Your feedback and support mean the world to us!